How To Repair and Maintain
  2003 Volkswagen Jetta 1.9L TDI Wagon

© 2019 Brian Mork


Home  •   Site Index  •  Wiki  • Blog


Introduction

This web page contains a narrative log and pictorial essay to maintain a 2003 Volkswagen Jetta 1.9L TDI Wagon.  This page is meant to teach you, document technical data, and perhaps most of all motivate and encourage you as you try to figure out your non-working car. I also have web pages about my 245,000 mile 1994 Suburu Legacy with 2.2L and a 1989 Dodge B250 Ram Van with 5.2L engine and a 2002 Toyota Camry and a 2018 Subaru Outback.

I
appreciate your link back to this page so the search engines think what I say is important!

Before you start work on a car project that may take several weeks,
consider canceling insurance or doing "storage" insurance. My insurer used to provide a "storage" option that provides only comprehensive coverage and drops the cost of a newer vehicle from $52.50/mo down to $5.00/mo.  More recently, they've changed the definition of "storage" to mean "state mandated minimum insurance," and for a Dodge van discussed in the other web apge, that change dropped cost from from $27.17/mo to $6.70/mo. Or, if you can handle the risk, you could remove ALL coverage including comprensive and save a boatload of money.

Purchase and Early Life
5-1/2 Years of Storage
Adding a Tow Hitch
Replace the Battery
Replace the Timing Belt
New Clutch
New Alternator
Engine Won't Start - Fuel Filter
Brake Light Switch
Window Fell Into the Door
Engine Coolant Sensor
Alternator - Again
Rebuild belly shroud
Glow Plugs
Glow Plugs - Again
Clutch Master Cylinder
Sun Roof Drains
Window regulator glass clamps loose
Feb 2019 - Coolant temp sensor again
Nov 2019 - Alternator again

Testimonies

9/29/2018 JK wrote, "Congratulations on running a succesful, useful and helpful website."

Early LIfe - 2005-2009

Living in California, we needed a new car.  I searched for a Jetta TDI wagon manual transmission and found 2 for sale in the nation.  I flew to Colorado to purchase a 2003 model.  We used it in the high deserts of central southern Colorado for 2 years with no memorable maintentance issues.  Maybe a door window up/down switch was repaired under warrentee.   Then I moved to the midwest in 2007.  The Jetta was used for an additional year, and then Fall of 2008, some life changed dictated that we didn't need the car but I couldn't decided to sell it.  I put it into storage for what turned into much longer than I imaged.  It spent 5-1/2 years in an unheated garage while other life issues happened.

June 2014 - 5-1/2 years of storage

I removed the Jetta from 5-1/2 years in storage. Approximately every 6 months I had added diesel fuel stabilizer, connected the battery, ran the engine up to 190 F, and stored it again with the battery disconnected.  Summer of 2014, I charged the battery, connected it up, and everything seemed to work fine except the A/C.  I needed to add one can of freon before the A/C would work. 

June 2014 - add a trailer hitch

I gave away the old trusty Subaru Legacy sedan, so now the Jetta needs to be able to tow a 6x8 snowmobile trailer.  I could not find any Class II hitches, so went with a Class I tow hitch good for 2000 GVW trailer weight. I considered the Hidden Hitch (Reese) and the Draw-Tight.  Either hitch needs bolt holes drilled through the spare wheel well.  Advantage of the Draw-Tight is that it is less intrusive using all horizontal bolts on the left side.  Advantage fo the Hidden Hitch is expected higher stability by using two vertical and one horizontal bolt on the let side.  Downside of the Hidden Hitch is that it is a little bit more critical fit because of perpendicular bolts, and the back left vertical bolts need some grinding of the stainless steel tail gate piece and cutting away some of the plastic tool crib to get both to lay flat when re-installed over the bolt head.

Also, be aware that the Class I hitch has a little ident inside the receiver (which you can sort of see in the 2nd picture below), which will prevent other Class II draw bars from fitting far enough inside the receiver to receive the securing lock pin. In other words, you have to have a new draw bar to slide inside of the new receiver.  Fortunately, the hitch I bought came with a new draw bar because I was planning on using an older one (which I now know will not work).


RIGHT click (or Mac dual click) on any picture to download a full-resolution copy.

parts received

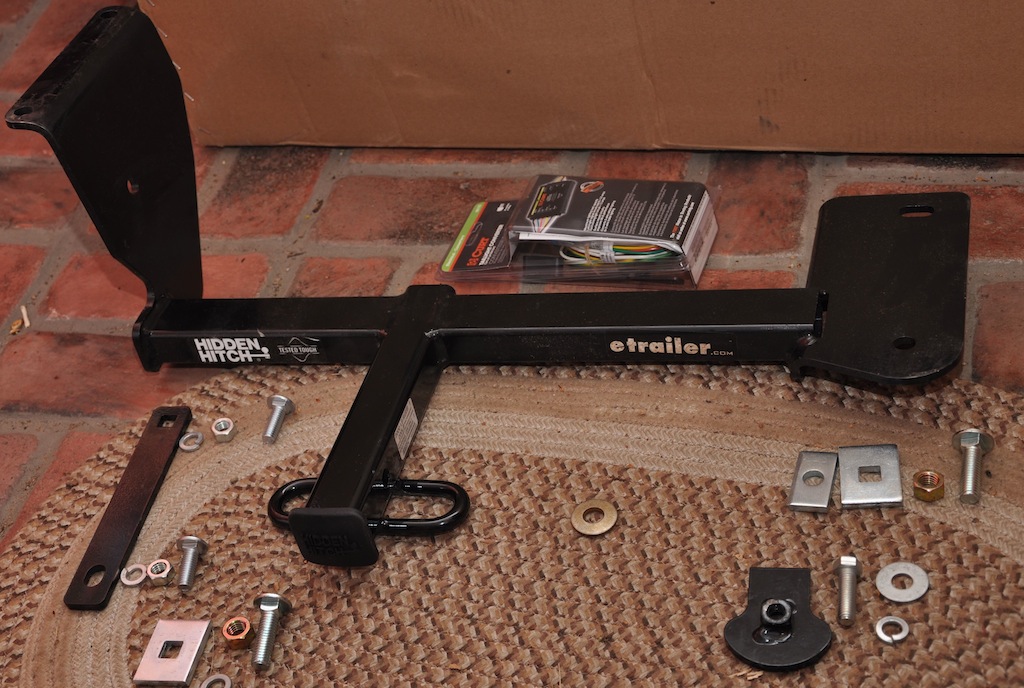
Parts received in the box.  I ordered the electrical adapter in the plastic box separately.  The parts are laid out showing where they go during installation.
Jack into position

I used the car jack to hold the hitch into position for a trial fit.  Right side is held in the tow loop using the plate and bolt provided in the kit.
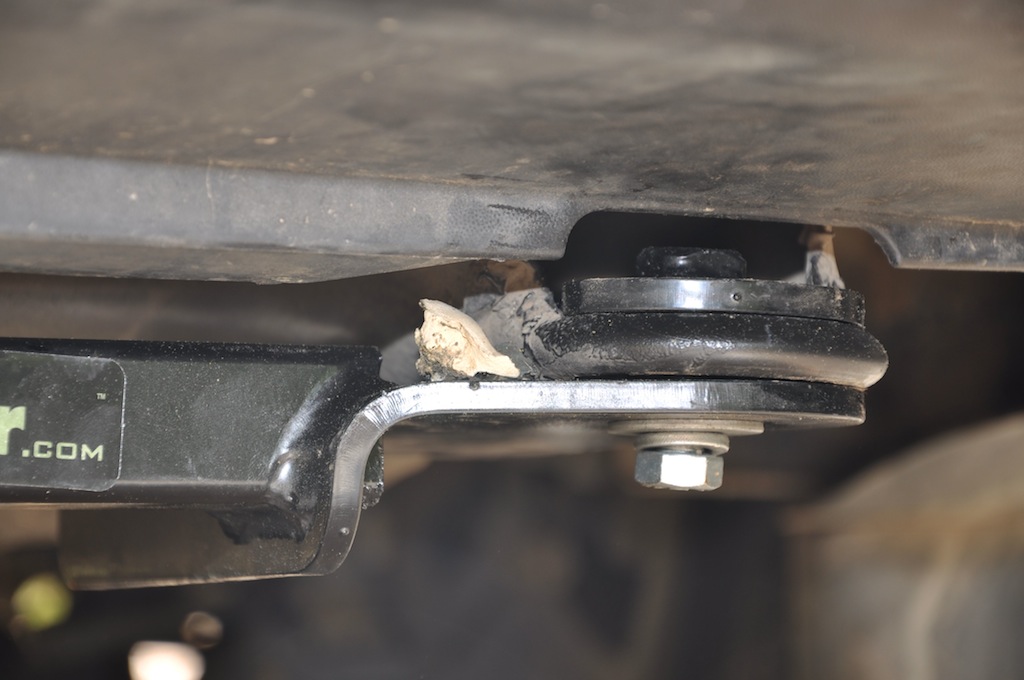
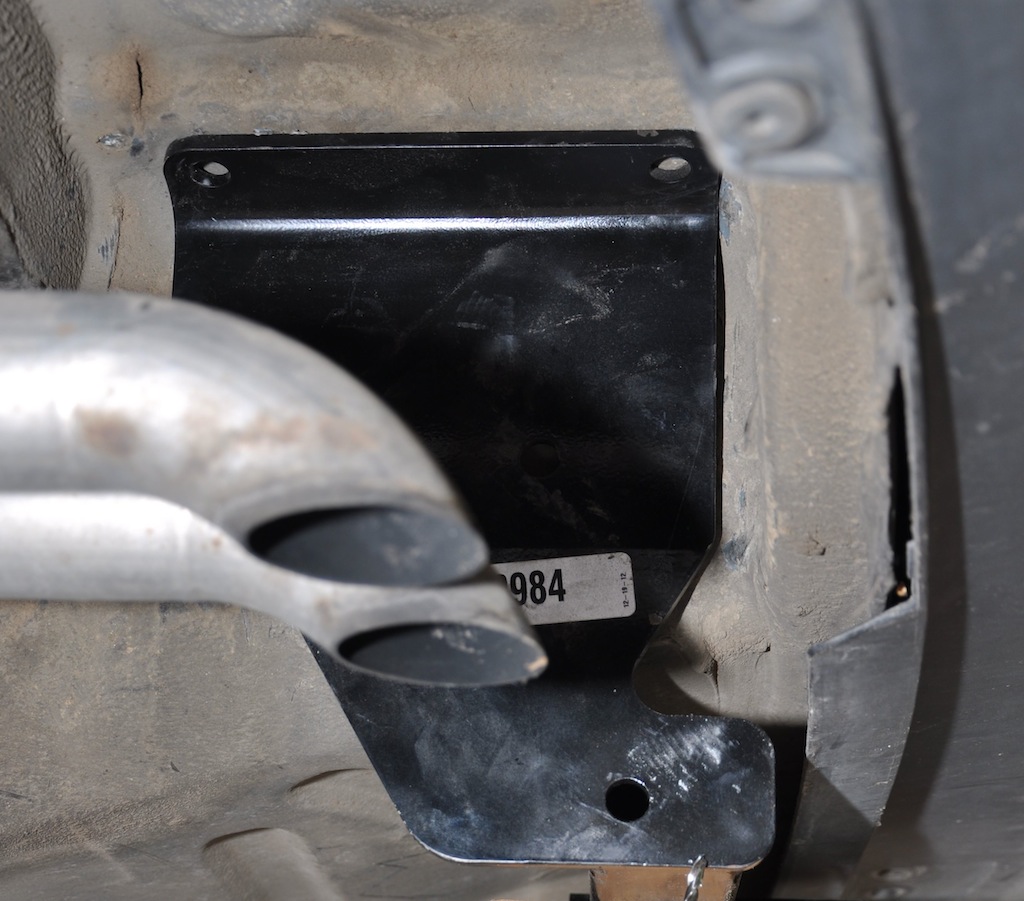
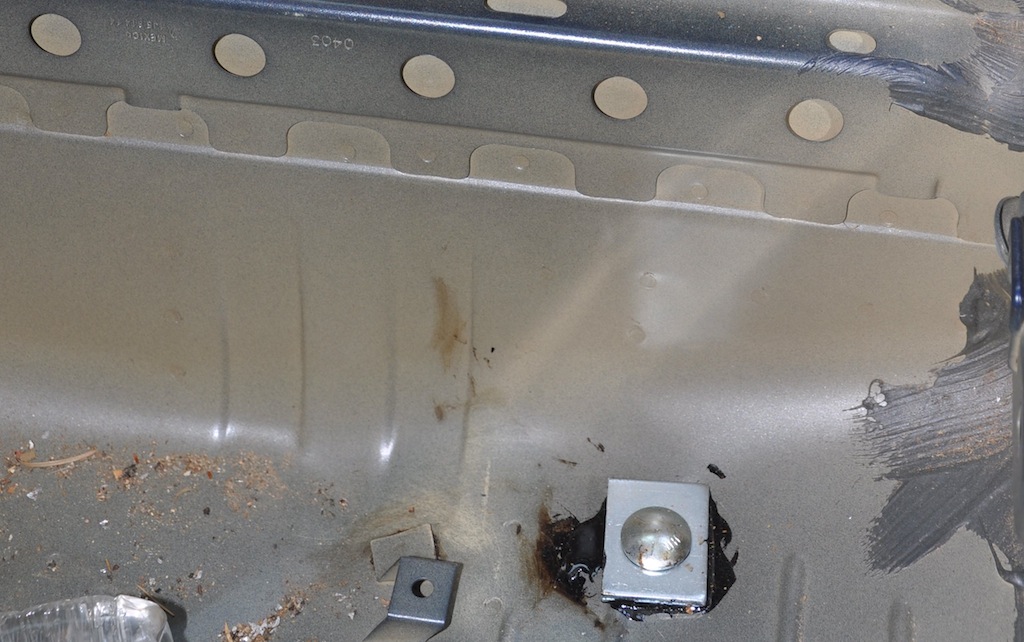
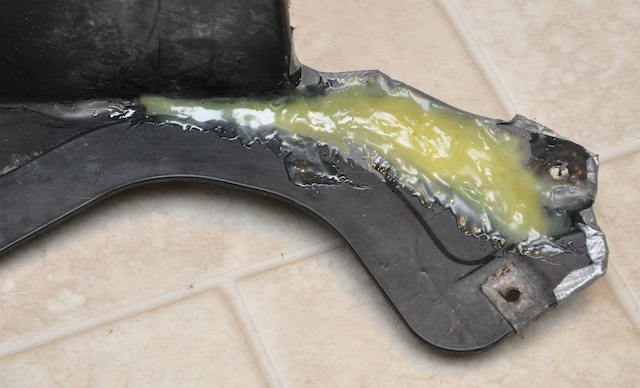
Tow hook bolt

The hitch and bolt plate did not fit flat against the tow loop because a blob of body sealant was in the way.  I used an X-acto knife to cut away the body sealant (shown as the white piece in photo).
Removing plastic cover

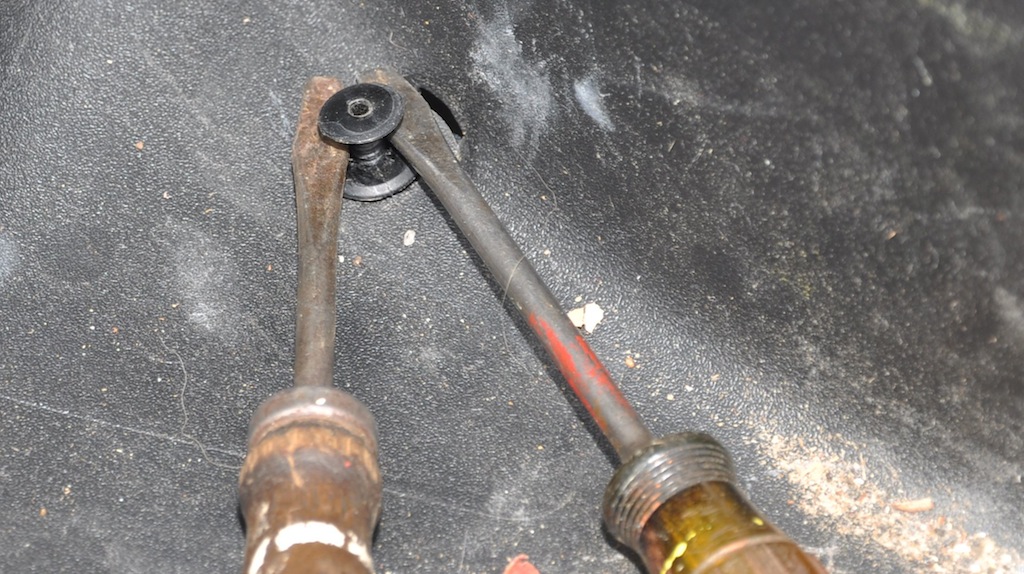
The rearward plastic storage bin behind the spare tire needs to be temporarily removed to access the metal floor for drilling.  Use screwdrivers under each side to not break the plastic retainers when you pull them up.
Test Fit Under

This picture looks under the car from the left side. Hitch needs to fit tight UP and RIGHT against  the body because bolts will be put in both ways. Adjust fore and aft to get the hitch coming straight out the back.
left holes

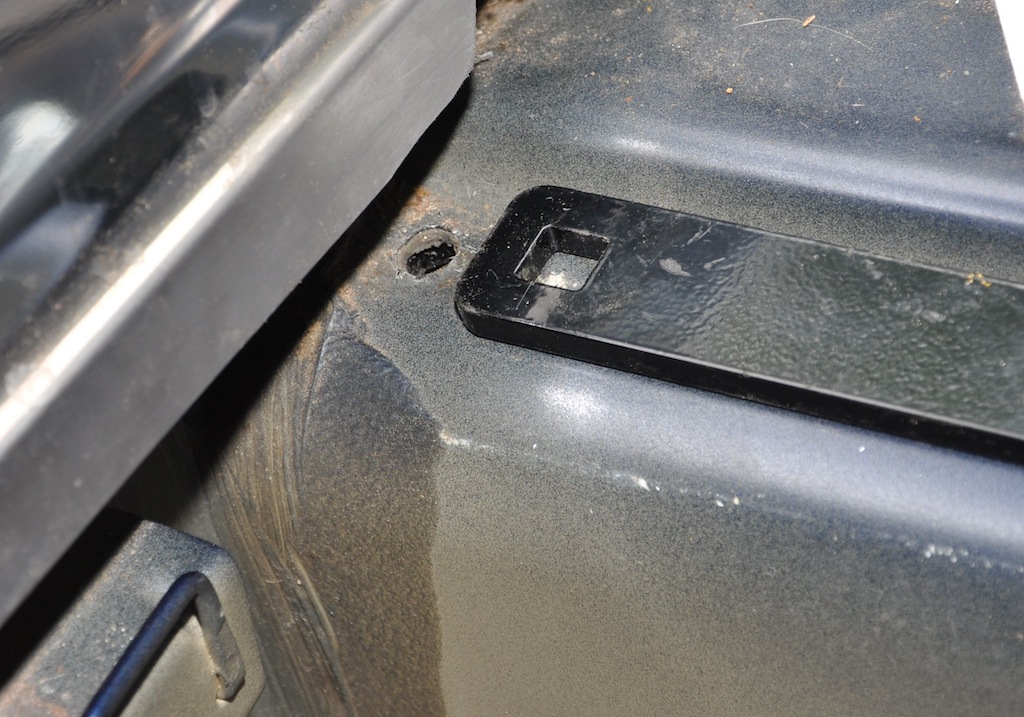
This picture shows the back left hole and the plate that will be installed over it.  I drilled the holes with a smaller drill and then drilled them out to the final diameter.  I used an even larger drill to de-bur the final hole top & bottom.  As you drill each hole, put a bolt in it to hold the parts in exact position so the next hole will be drilled in the right place.
plate in place

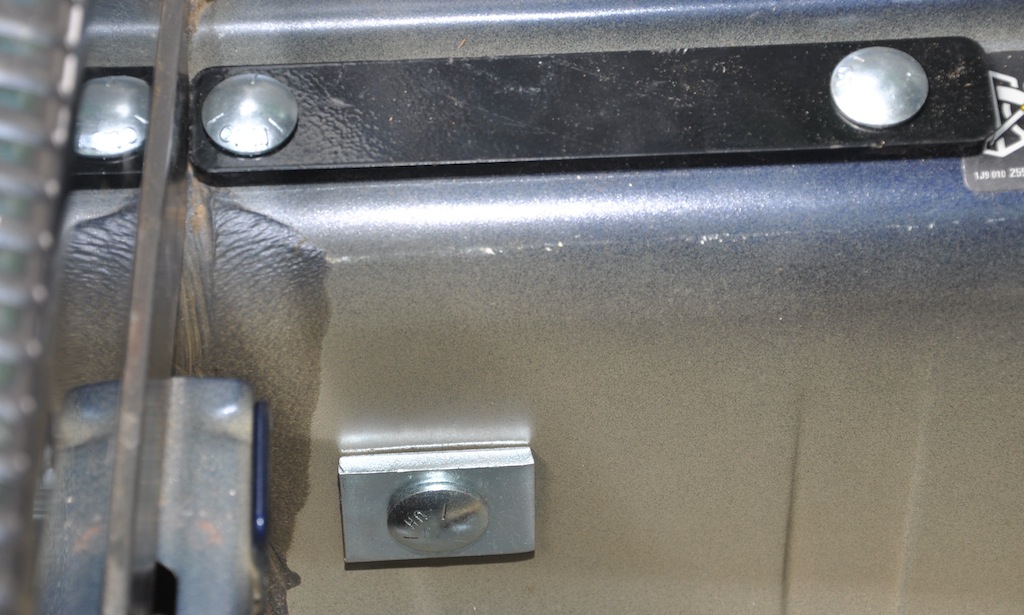
This picture shows the left side bolts and interior mounting plate temporary installed. After drilling holes, install the pieces at least finger tight to make sure everything fits. I had to adjust one hole with a round file about 1/32". The back bolt is seen mirror imaged in the stainless steel molding over the tailgate.  I had to use a metal grinder and remove maybe 1/4" of stainless to clear the plate and the bolt head.

bracket fit

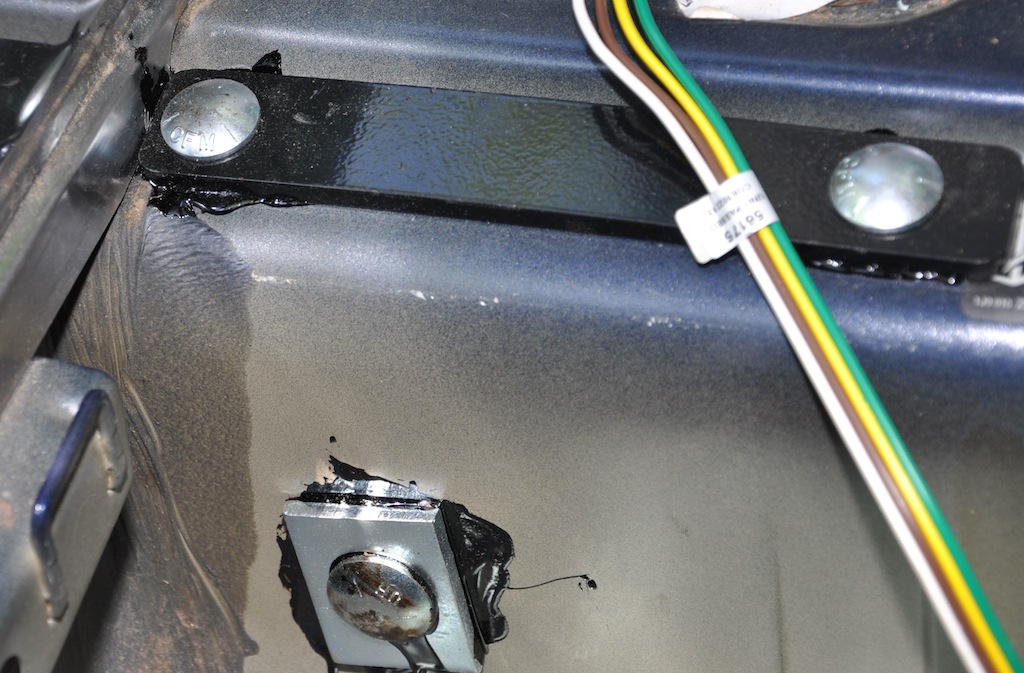
Left side bolts in final installation - with black tar water proofing and rust proofing.  Temporary installation was removed and each bolt/nut was coated with black tar and re-installed. After all five bolts were installed (3 left, 2 right), all were torqued to specification.

right side final install

The right side has only one new bolt hole required. In addition to the visible plate and nut on bottom, there is a spacer plate wedged between 
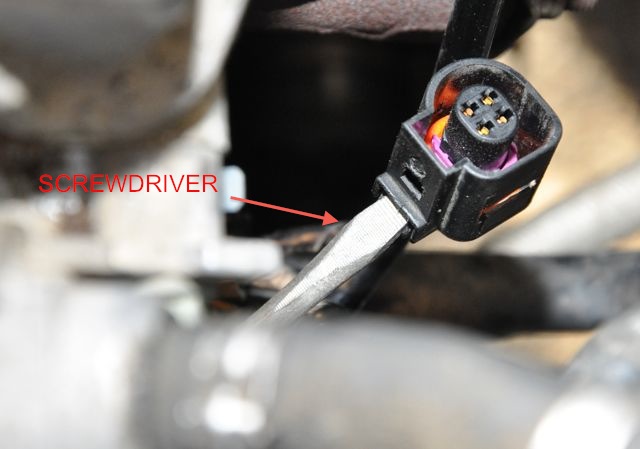
body frame panels.  I used a long flat-blade screw driver to gently tap it into place from underneath and behind the car.  Get the hole alignment right on the first time because there is no way to remove the spacer once jammed into place. I would advise peeking in the trunk, and when you see the bolt hole starting to line up, put a screwdriver in the hole and start to wiggle it in alignment as you put the last few hammer taps into place.
{picture pending}

Shows the bottom side after final installation, including hardware 100% covered in black tar water proofing.

left wires

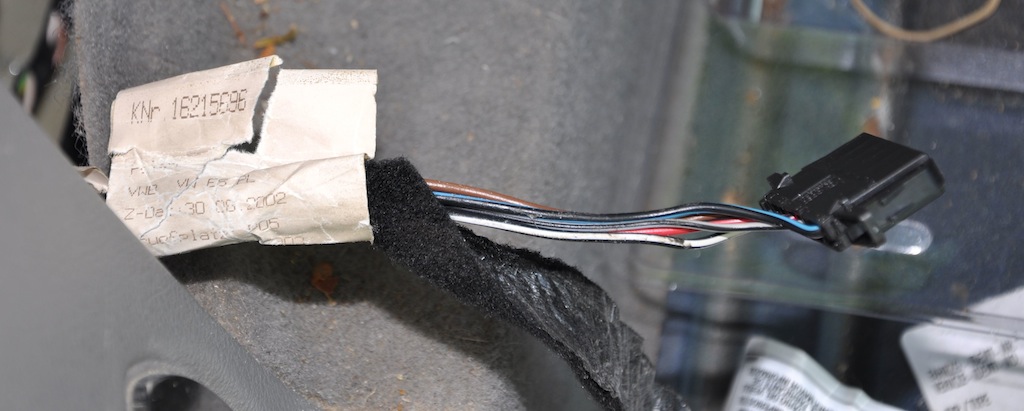
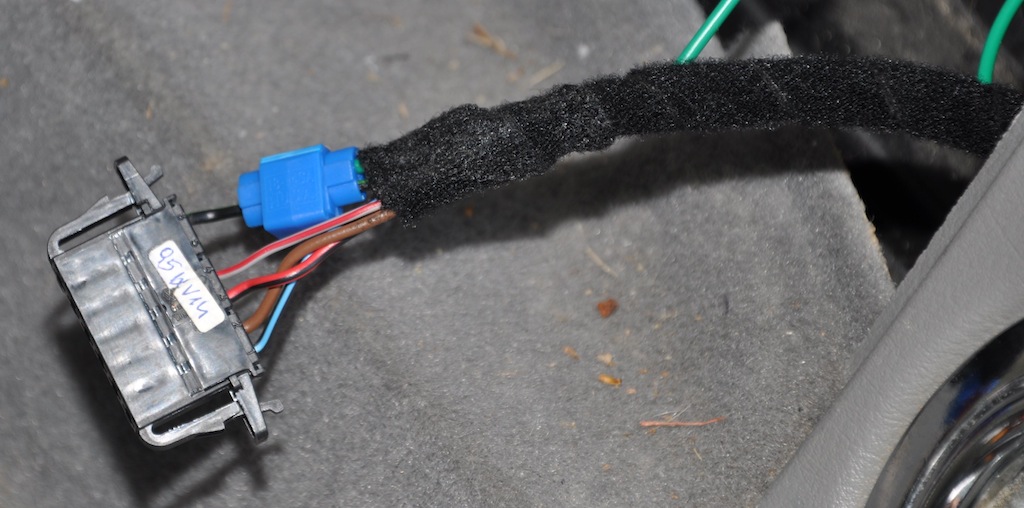
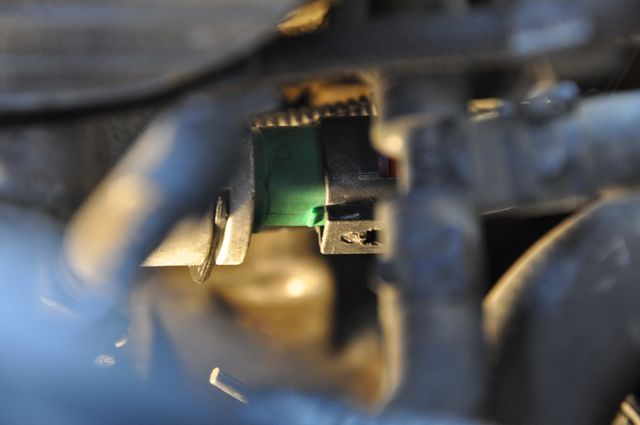
This shows the wiring harness disconnected from from the rear left tail light, and before I spliced into the wires.


wire grounding

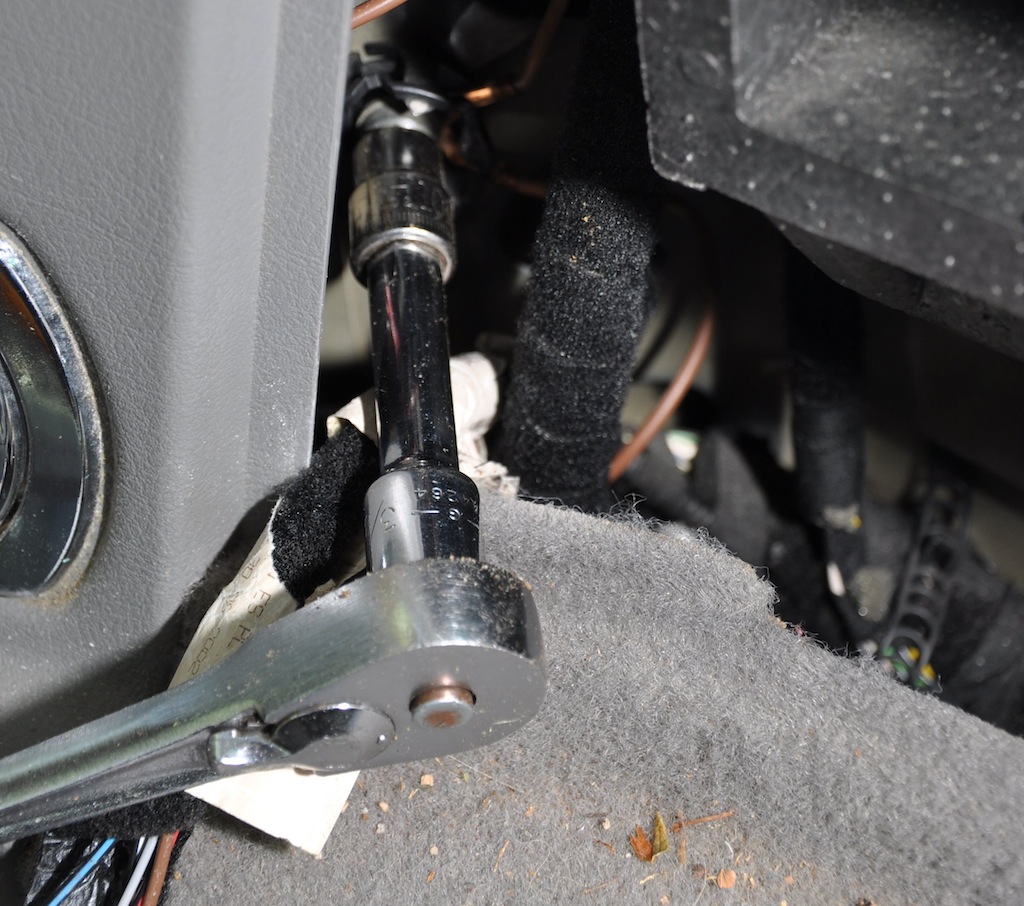
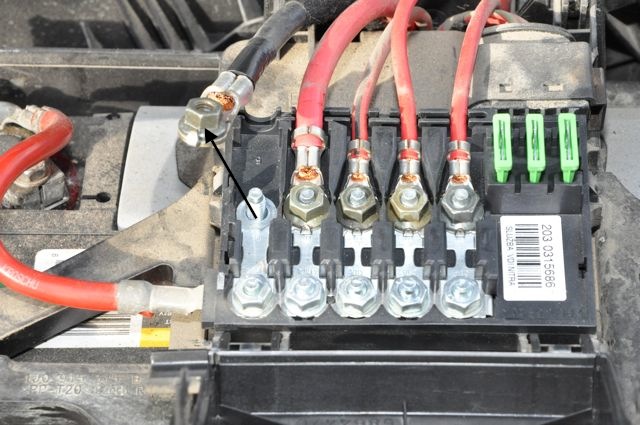
This picture looks backwards and left into the rear tai light area.  I used a socket set to remove the nut from the bolt stud that provides a grounding point.


ground connections

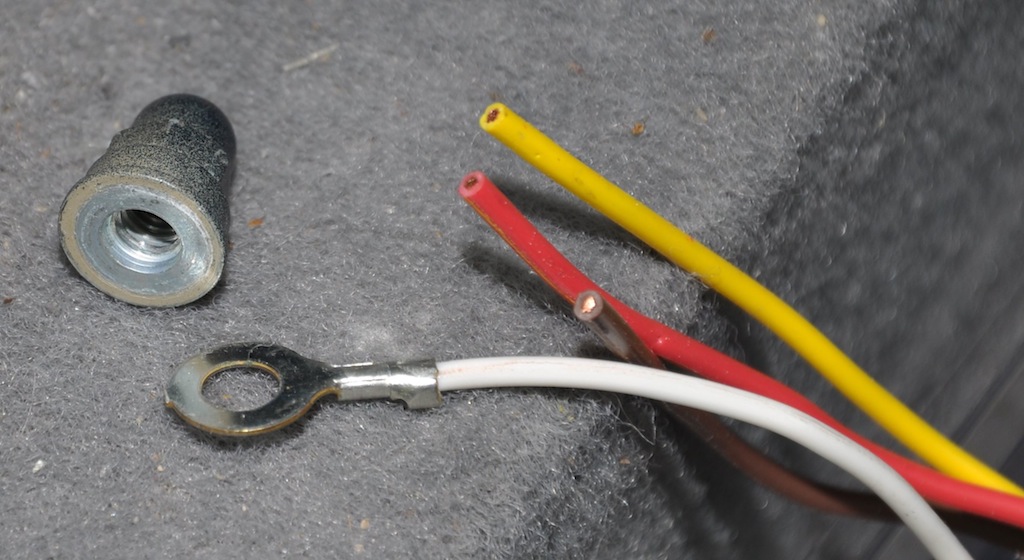
Wires from the electric adapater that connect on the left side, and the cone nut that came off the grounding stud by the back left tail light. The white ground wire came with a connector installed.

grounding bolt

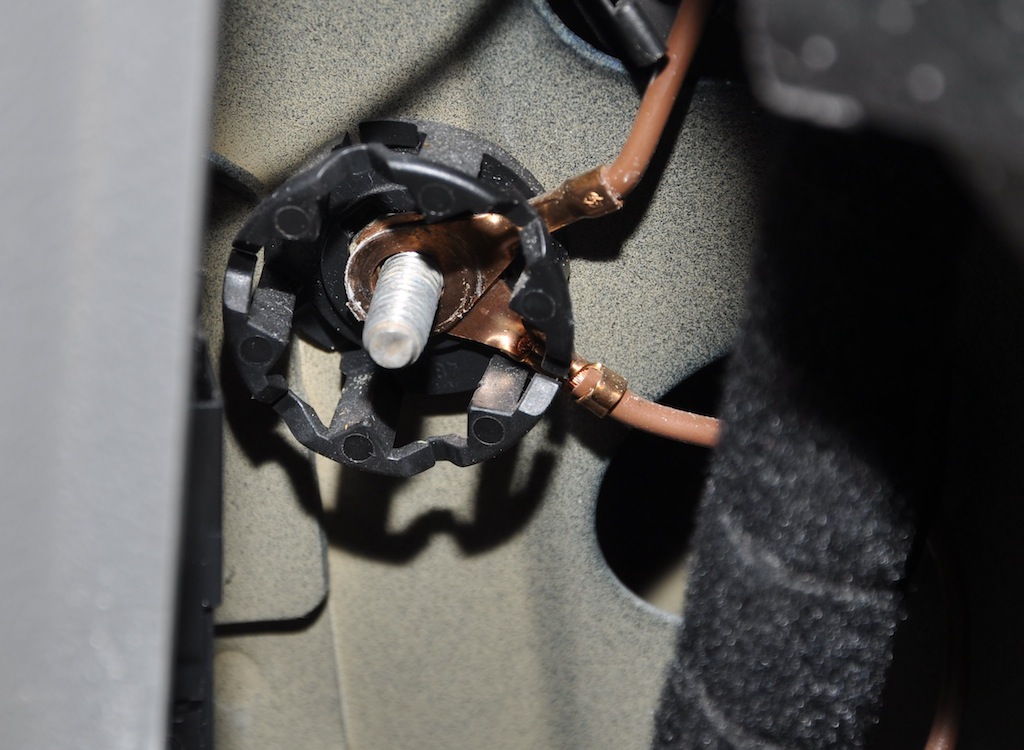
The left rear ground bolt after the nut was removed.  The white ground wire was slid onto the same stud and the nut was replaced.

wires left side

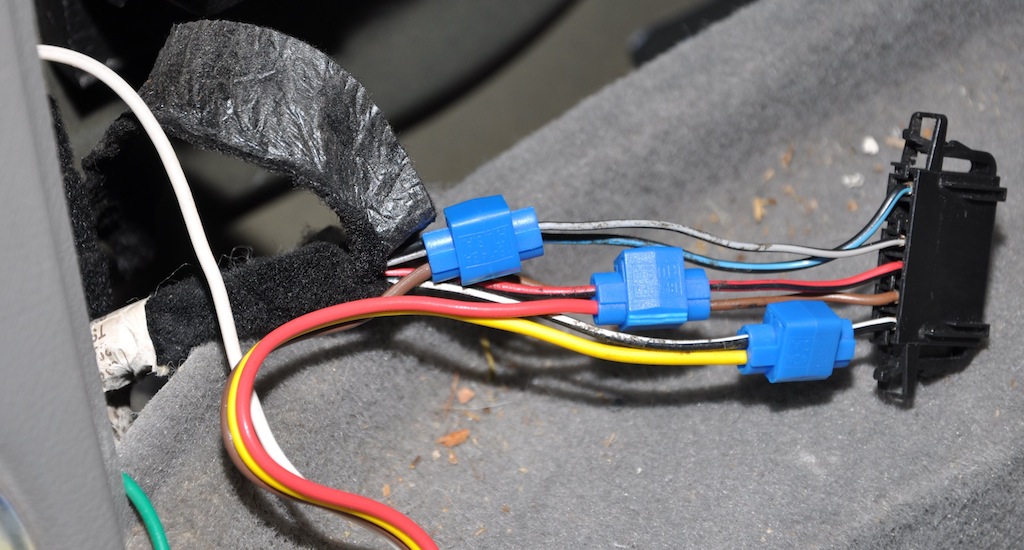
Left side wire installation for left running light, turn light and brake light.  Notice how the wire lengths and wire splices were staggered so the splices don't bump into each other. The white wire goes behind the panel to the grounding bolt.

left side spliced

Driver side re-wrapped after splicing.  Notice how the staggered splices fit to make a tight wire bundle instead of a bulge.
 back tailgate

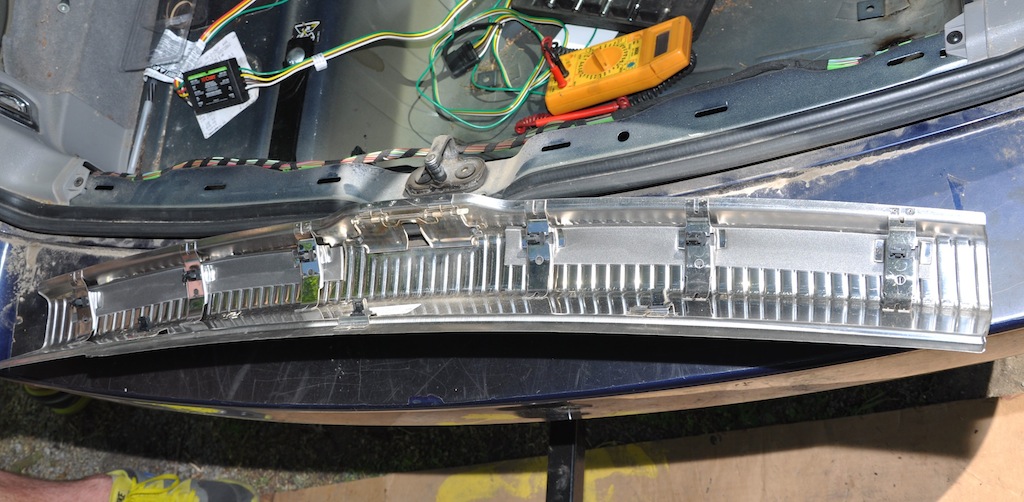
Back stainless steel tailgate removed to route the green right turn wire underneath it to the right side of the car.
left side wrap

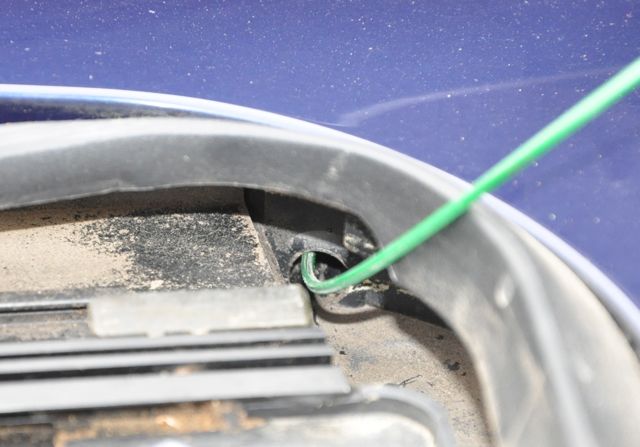
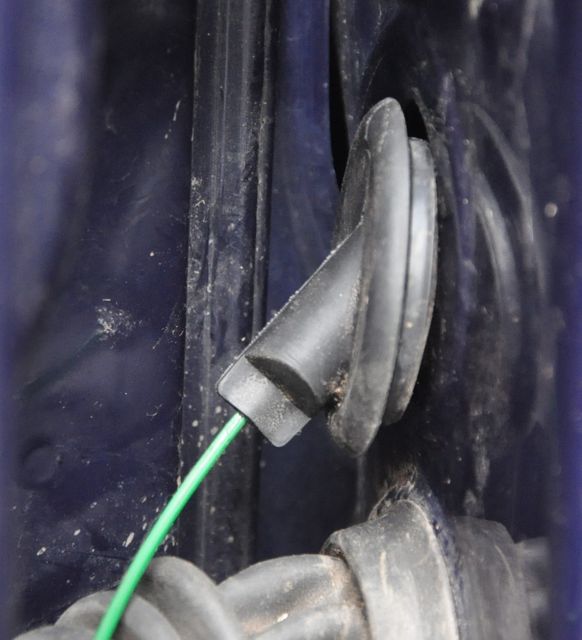
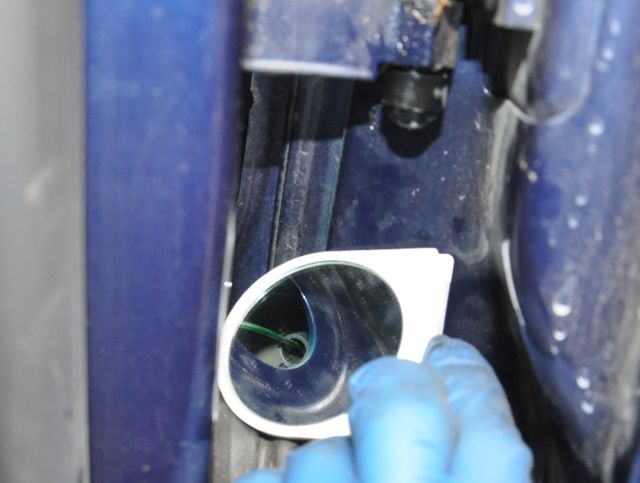
Passenger side wiring rewrapped after splicing in the green wire.  I needed to use a coat hangar wire with hook on the end to wiggle the long green wire (right turn signal) from the tail gate area into the right tail light area - it's a tight fit due to body panel pieces.

instructions

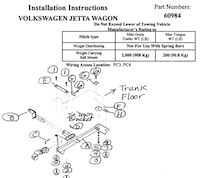
The folks at etrailer.com were phenomenal.  I could not read the b&w low contrast copy of a color instruction sheet.  They said my brand of hitch was actually made by Reese and they found another instruction sheet and emailed a copy.  I advised it had different fittings than mine and a day later I received this hand-noted high contrast instruction sheet for my hitch (click on the image to get a pdf copy).  Perfect!  Yea for etrailer.com!


July 2014 - steady as she goes

Another 2600 miles pulling a 1700 pound GVW snowmobile trailer.  Transmission seemed to have no trouble.  Engine appeared to have no trouble keeping a steady 70 MPH on the country's interstates.

September 2014 - new battery

During another 5000 mile trip, the cool weather started settling in and I could tell the battery was having trouble turning over the diesel engine first thing in the morning.  And then it happens.  The starter just clicked, with no starter rotation.  Battery was dead.  Actually, I'm surprised it worked as long as it did after being stored for 5-1/2 years.  I drove the car one-way to the store and brought tools to change the battery because I knew it wouldn't start again once I went in the store.  If you do this, be sure to bring a 3/8" socket extender to reach the bolt securing the front clip on the bottom front edge of the battery.

$148 later (ouch!), the car starts great.  I also picked up two more gallons of Rotella-T 5W40 synthetic diesel engine oil.

March 2015 - new timing belt, water pump, idler pulleys, timing  belt.

I purchased a new timing belt kit on line and paid a local VW specialist shop to put it on.  Preventive maintenance, I'm sure.  With the old Subaru, I would run the belt until it broke because the pistons clear the valves in any location.  That's not true with the VW 1.9L diesel, so if that belt breaks, it a $2000+ problem.  Everybody says that when you're that deep into the engine, change the water pump, too.

I bought the parts for about $280 on line and a european auto shop did the work for about $580.

September 2015 - clutch disintegrated.

On the way to work, I downshifted to slow down and "boooP" - the pedal hit the floor.  And nothing would bring the car back into gear.  With the engine off, putting it into gear and bumping the starter moved the car.  Yea.. the clutch was gone at 111,747 miles.  Towed to a shop.  Paid $1347.  New clutch, flywheel, pressure plate, fork pivot, slave cylinder.

They left a ring clamp crushing the air intake manifold.  :-(


November 2015 - new fuel filter really helped!

The Jetta's fuel filter has a rather cheapy looking plastic drain screw on the bottom.  I drained it periodically and no water or debris or anything came out so I figured I was good to go.  Not so!  After 113,748 miles of operation, the car failed to quickly start.  It required about 8-12 seconds of cranking the engine before it caught.  I was convinced the fuel pump in the gas tank had quit, except monitoring the fuel lines between the filter and engine showed there was still fuel circulating back from the engine once it was running.  Besides, the fuel pump costs $300+ to replace - without labor.

Instead, I pulled my new fuel filter out of storage and one day after work, swapped out the old filter.  Poof!  Like magic, the car started instantly.  Very big difference.  I saved the old filter so I can cut it open and see what's going on in there.  Although there was no sediment or water, the filter paper itself must be chock full of crud and plugged.

May 2016 - alternator pully blew up

Driving on a trip about 300 miles from home, I came to a stop sign and as I pulled away, I heard large thumping sounds from the engine compartment.  Immediately shifted into nuetral (this is one of the very few manual 1.9L TDI wagons I'm aware of) and glided to a stop in the parking lot of a rural stop-n-go gas business.

Looking under the hood, the problem was obviousl.  The alternator pully was gone and the belt simply spun around the shaft.  Uh.. time for a replacement.  It turns out the TDI alternator has a shaft clutch and the alternator is only used when the car thinks it's time to charge the battery. I guess there have been a lot of failures.

My insurance company was ridiculous.  Yes, they would tow me 2 miles to the local back-woods 1960's era repair shop that had never seen a car like mine.  The roof of the building was caved in and it didn't even look like they were in business any more.  Over a holiday weekend, the plan was to drop off the car Friday night and then talk with the repair shop on Monday - if they showed up for business.  In the meantime, there was no hotel within 20-30 miles of where we were at, and I'm not sure where me and family were suppose to sleep.

Plan B.  Called a relative and they came got us with a truck able to tow the trailer we had and they had a friend who did car work at home on a lift in the garage.  Savior of the weekend!  For about $280, he replaced the alternator and the weekend continued with only a day delay.  However.. I think the alternator was not the highest quality.  9 months later...


August 2016 - brake light switch replaced

When the brake light switch quits working, many things quit working!  For me, when I got home one day and got out of the car, the brake lights would not go off.  Engine off.  Ignition off.  Brake lights still on.  Something was wrong and would drain the battery if I didn't figure it out. 

Turns out there is a brake switch recall.   Got it replaced.

January 2017 - rebuild the window regulator (up/down mechanism)

Driving to work on a frozen cold day, I tried to roll down the driver side window, and the next thing I know the entire window was falling into the door!  I grabbed it with one hand and steered to a parking lot while I stepped on the clutch to disengage the engine (I was out of hands to shift into nuetral).  I move the window control up and down until it jammed the window closed.

The dealer estimated $630 to fix the door ($345 for 3.0 hours of labor) and $285 for a door regulator.  I found on-line window clips for $17 each, cable assembly for about $70, and an entire inner door panel with the window regulator in place for about $60.  Looks like this was going to be my job to save money. 
After 3 days of rain, I had a chance to open the door panels and see what was wrong. 

The door panel came off perfectly using the instructions in the References section at the bottom.  I popped the two inspection and window clip tighten bolts and removed the up/down drive motor so I could push the window up or down.

When I lowered the window to see the bottom, what do my eyes behold?  New, updated metal clips!  Turns out some time in the 2003 model year the plastic clips (which notoriously break - just search jetta window clips for all sorts of stories) were upgraded to metal.  Yea!  I poked around a bit without taking the inner door panel off.  Clips seemed good.  Rubber grippy pads that touch the window seemed good.  Maybe they just came loose when I tried running the window up and down while it was frozen.

I found nut tightening specs on the vwvortex website below (10 NM = 88 in lb) and set my window all the way down and all the way back and tightened them back to about 65 in lb.  That's as far as my inch pound wrench went and it felt like I was crushing the glass.  I figured if it came out again, it would only cost me an hour in disassembly and reassembly again.

Lesson learned:  Don't try to lower windows frozen shut!

January 2017 - coolant temperature sensor

The car started kicking out an engine check light that was intermittent and then stayed on all the time.  The folks at AutoZone said it was a coolant high voltage and suggested I buy a new coolant temperature sensor. Looking at explanations of the OBD codes, yielded the code below.  Some special VW codes also exist. You can even build your own OBD cable.

P0118 - Engine Coolant Temperature Sensor Circuit 1 High Input

The mystery is that my dashboard temperature indicator was working fine.  First I checked with the dealer.  Parts cost $59 and require 3.5 hours of time to change it, totalling $461.50.  What?!   The part at AutoZone cost about $6, so I simply had to try this myself.

After checking on line, this apparently happens to a lot of people and there are several instructions on how to change the sensor on the back driver side of the engine.  It's a press fit held in place with a plastic C-clip ring.  The only problem is the engine block hole leaks coolant out when you pull the sensor, so either you drain the coolant down to the level of the sensor, change the sensor, and refill with coolant --or-- do a quick swap and try to not let a lot of coolant escape.

With my $6 replacement part in hand, I finally figured out how to get both hands down on the driver back side of the engine and wiggled the connector loose with a small flat blade screwdriver.  I did have to pull the air intake manifold, but that was a fairly easy spring clip.  To disconnect the wire bundle, stick a flat blade in the side hole perpendicular to the wire bundle (not the one on the end by the wires with the flat blade parallel to the wire bundle), and rotate it toward the wire bundle.  That will release the clip and you can pull the wires off.  See the photo below.

Before pulling the sensor from the engine block and drooling coolant out all over the place, I pulled the wire bundle loose and plugged in the new sensor and started the car.  I still got the engine check light with the new sensor dangling in air.   I noticed the dashboard temperature was on the low end.  I plugged the cable back into the original sensor, still in the engine block and turned on the ignition and let the car run for a while.  Sure enough the dashboard panel came up to temperature and after about a minute, the check engine light came back on.

Swapping the wire bundle back to the new sensor not in the engine block, the dash showed the temperature on the low end as I would expect because the sensor was just measuring ambient air temperature.  In any case, the check engine light still came on.   The old and new sensor allow/make the dashboard panel engine temperature dial work.  Both cause a check engine light. I need to go look again and get the exact engine code and exact wording.   Maybe I just need to reset the engine code and light.

After a couple weeks of resetting the check engine light, I met with a friend who had a more complete diagnostic capability with his laptop computer.  Here's an exerpt of the printout:

VIN: xxxxx   Mileage: 130885miles
-------------------------------------------------------------------------------
Address 01: Engine      
 
2 Faults Found:
17056 - Cylinder 2 Glow Plug Circuit (Q11)
            P0672 - 35-10 - Electrical Fault - Intermittent
16502 - Engine Coolant Temp. Sensor (G62)
            P0118 - 35-10 - Signal too High - Intermittent
Readiness: 1 2 0 0 0

-------------------------------------------------------------------------------
Address 03: ABS Brakes      
   No fault code found.

-------------------------------------------------------------------------------
Address 15: Airbags
No fault code found.

-------------------------------------------------------------------------------
Address 17: Instruments       
No fault code found.

-------------------------------------------------------------------------------
Address 19: CAN Gateway
No fault code found.

-------------------------------------------------------------------------------
Address 46: Central Conv.     
2 Faults Found:
01331 - Door Control Module; Driver Side (J386)
            49-10 - No Communications - Intermittent
00928 - Locking Module for Central Locking; Front Driver Side (F220)
            27-10 - Implausible Signal - Intermittent

-------------------------------------------------------------------------------
Address 56: Radio
No fault code found.

End-------------------------(Elapsed Time: 05:01)--------------------------

At the time, I didn't know what glow plug error was about.  Engine coolant problem "signal too high" is the same code I was getting from the auto parts store diagnostic.  I think the sensor is going open circuit, leaving too much voltage to be sensed by the computer. 

The door control module and locking module were left over codes from when I pulled electricity on the door switches to repair the window lifters.  In fact, after we took this data, we reset the codes and none of them came back.  Maybe all was fixed!

Well.. I received no error codes for about a week, and then ...coolant over voltage again.  Okay, the sensor must be intermittently bad and I'm going to just replace it.  It's worth the cost of an $8 sensor just to be sure.  Onward to replace the coolant temperature sensor.


RIGHT click (or Mac dual click) on any picture to download a full-resolution copy.

drain hose

First step is to drain some coolant out of the engine block so that it doesn't come flowing out the sensor hole while I'm switching sensors.  It's easy to drain coolant fluid from in front of the driver side front wheel.  The red arrow shows the knob that opens the drain.  It's not like a twist open faucet.  Instead it does about 1/4 turn out of a detent, and then the entire knob slides out about 1/4" and the fluid starts flowing. Size of the tubing was ...uh.. forgot. 
collect coolant

Collecting almost all the coolant in a clean catch basin.  Actually, all the sediment and flakes sink to the bottom and I decant off the clean liquid back into the car. Works great.
drain the low point
Turns out the radiator drain was not the low spot for the engine block, which I needed to drain so fluid would not flow out of the pressure switch hole while I was switching sensors.  This is a photo looking down toward the ground from the front of the car.  Notice I pulled one of the coolant lines from the engine coolant housing.  The green arrows show the connection I pulled apart.  It came apart pretty eaily once the clamp was slid back.
unsnap electrical plug

The coolant sensor on the back of the engine driver side is a little bit hard to get at.  Depending on how your coolant sensor is rotated in the hole, the release for the electric plug could be hard to release.  This photo shows how to put a screw driver blade into the connector from the wire side toward the sensor.  Once in the slot, leverage the handle toward the wires leaving the sensor.  Simultaneously tug on the plug and it will come out.  The area is really tight so I actually used a short 3" stub of a screwdriver tip I had laying around - there wasn't enough room to get an entire screwdriver in place.

Also note if your car has a 2-WIRE or 4-WIRE sensor because the parts store will ask you.
orient the sensor
After pulling the electrical plug, pull the plastic "C-clip" downward until it disengages.  I used a screwdriver for the first 1/4" and then just pulled it downward with my fingers.  After the clip is removed, pull out the old sensor, and make sure you get the O-ring, too.  I had to reach in the hole and pull out the O-ring.   When putting in the new sensor, lubricate the new O-ring.  I found it easier to put the O-ring all the way in the hole and then insert the sensor.  Rotate the sensor so the connector disconnect is in a convenient location.

  This photo shows the new sensor just short of being clicked into place, looking from standing next to the driver side fender.  One side of the C-clip is visible to the left in the photo.  I rotated the sensor so that the little catch and the screwdriver release are toward the driver fender side of the car.
slow way to fill

To refill the coolant, I initially pulled the most convenient line - top front and center.  It took fluid very slow, so I reconnected the two ends highlighted with the red arrow in the photo and pulled off the ~other~ end of the same tube.  This allowed me to add coolant faster.  When I added about 1/2 the coolant, it started to overflow out the open hole on the back behind the engine (sensor was not in place yet).  I stopped adding coolant and mounted the new sensor.

I reconnected everything and put the rest of the coolant directly in the reservoir bottle and started the engine.  In about 45 seconds, all the extra fluid had been sucked into the system.  I topped off the reservoir and closed everything up.

February 2017 - alternator (again) - brushes

I started hearing grindy noises from the engine compartment.  Having just messed with the coolant, I initially I thought it was a water pump, but that had been replaced with the timing belt.  The power steering pump sounded loud, so I checked and found the fluid was very low.  Topping it off made the sound go away, but that must have been a coincidence because about 10 seconds later I got an alternator light.  Checking the voltage on the battery, pretty much confirmed that.  The voltage was nowhere near 14 volts, but a low 12 volts and getting lower the longer I watched. As the alternator clutch clicked on and off and the grinding noise changed.  Time to change the alternator. 

RIGHT click (or Mac dual click) on any picture to download a full-resolution copy.

covers

You'll need to remove 4 shrouds - the engine under belly shroud, the battery cover, the cover on the top of the engine, and the right fender belly shroud.  The side one has one slide on support in the front, and two friction nuts holding the plastic to the metal frame.  I found the friction bolts came off easily by using a small size construction pry bar and using the 90 degree bent end, I tilted (not pried) the nuts loose.  I don't have a picture of the fourth shroud because it was off in the house getting an unrelated structural repair (see down later in the web page).
elec safety

Disconnect the alternator output line from the hot battery bus.  I don't have schematics, so I ~think~ I got the right wire by following from the alternator.  If you do not do this, and you allow the other end to short against any metal engine parts (going to happen), you are going to get an up-to-110-amp spark (size of the fuse link) because this will short your battery to ground.  Disconnect the wire!
looking up

First I easily rotated the serpentine belt tensioner and slide the belt off the A/C pulley. 
Then, remove the engine turbine air cooler pipe.  The connections are incorrectly labeled "Turbine Air Inlet" in the photo.  Instead, this tubing is part of the cooling loop that takes hot compressed air and cools it before returning to the engine intake manifold.  One end has a typical hose clamp and the other end has a wire clip that is easy to pull loose with a flat blad screwdriver.

The A/C compressor comes off next.  Once you pull the bolts, you'll need to gently pry the compressor out of position because it has friction bushings on each support bolt.  I found the freon lines were long enough to just let the compressor dangle on the ground.
look over
Unbolt the alternator like the A/C compressor.  Again, pry it loose.  This will be harder because space is limited.  I went back and forth from the top and bottom and left and right sides and it eventually came loose.

Use a torx bit to remove the passenger side radiator fan and move it out of the way.  Then you can wiggle the alternator out the bottom of the engine compartment.  First time I did the whole process, I had 4 hours invested.  Next time, when I know ahead of time what tools to use and how to do it, I predict about 1.5-2 hours.
bushings
After getting the alternator out, I could tell it had a bad bearing by pushing on the pully and spinning the pulley.  Strangely, I think it was the back side bearings (by the brushes).  Since this alternator had a lifetime warrantee from only 9 months ago, I was able to get a free replacement.  Actually, I looked at buying a $190-$200 new Bosh alternator thinking, "I'd rather not do the work to replace another one even if it is free." I hope I made the right choice.

  The A/C compressor bushings slide a little bit open easily with a C-clamp and a socket that fit over the bushing.  The remanufactured alternator going into the car (warrantee after the first one failed after 9 months), had bushings that had been bead blasted into position. They did not budge with the C-clamp.  I ended up using the mounting bolts (which were threaded all the way to the top), a socket, and washers as shown in the photo.  I tighted the bolt and pulled the bushings through the hole - about 20-25 ft lbs of torque was required, which is more than the working torque for the 8.8 grade bolts, but I think I was well short of the torque necessary to stretch or break the bolts.
elec check
Everything went back into the car in reverse order.  Be careful to get the belt routed about right so you don't squish it with the belt tensioner.  Getting all the parts back took a about 1.5 hours the first time I did it.  Watch the torque specs on the bolts.  I looked up 8 mm and 10 mm bolt torques for 8.8 grade bolts.  The alternator and the belt tensioner require about 17-20 ft lbs and the A/C bolts use about 30 ft lbs.  I would be interested to hear from anybody with a service manual that gives the VW recommended torques.  I just used the generic bolt size torques.

The belt tensioner was easy to hold in position from underneath the car as I slid the belt around the A/C pulley.

After installing everything, I started the car and all appeared to work.  Initially I left the alternator wire loose at the bus bar to see if I could measure DC or AC voltage directly from the alternator.  Nothing.  The car must be too smart and leave the alternator clutch disengaged if it doesn't sense the voltage.  Oh well.  I turned off the car,  connected the wire, and re-started the car.  Nice 14.2 volts, rather than the slowly dying 12 volts of the battery that I had before. 
serpentine belt routing
Serpentine belt routing for reference.


tool story  
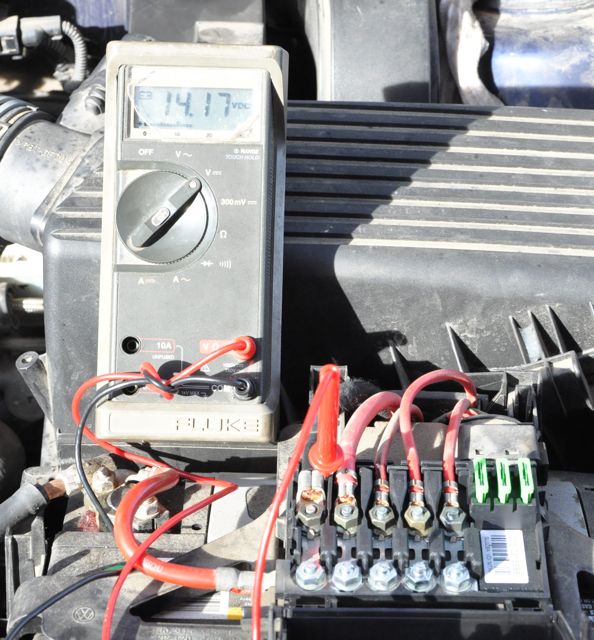
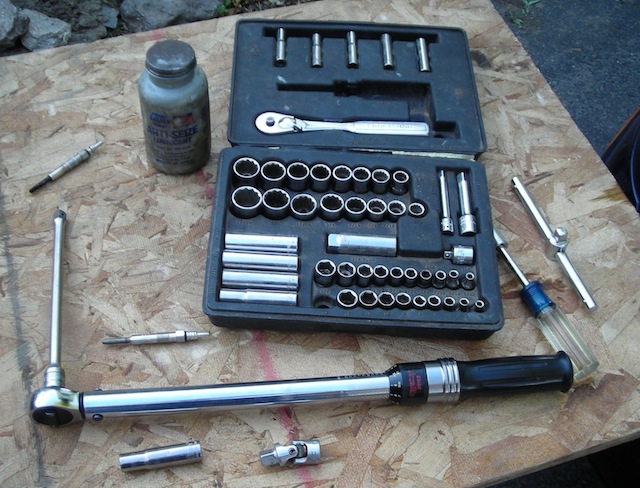
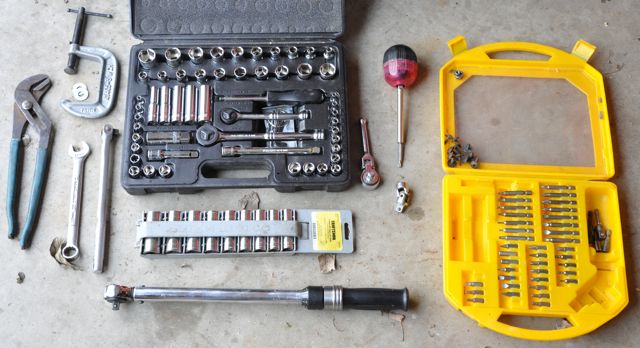
Here are the tools I used to replace the alternator.  It would help a lot to pre-position these.  From left to right...

February 2017 - repair the engine right fender belly

The next photo is the rear of the passenser side front belly pan.  The curved area is where the under-engine belly plastic cover screw in place.  Somewhere in the car's history before I owned it, the bumper forward of the right tire had been scraped on something that removed a section of the plastic about 4" in length.  Although I had the engine belly pan off many times, replacing the alternator was the first time I had this piece off.  I decided it was time to fix it.

RIGHT click (or Mac dual click) on any picture to download a full-resolution copy.

rebuild wire
I drilled two holes on the left and right side of the hole so that the little flange piece with the bolt hole would exactly stay in position with a wire brace (the plastic flange piece is slipped out of position in this photo).  I positioned everything in place and put a layer of JB Weld around the hole and surrounding the wire.  It has a good history of sticking to plastic things and flexes just a little bit to make it not crack loose. 
epoxy filled
With the JB Weld base cured around the edges, I then covered the hole from the bottom with duct tape and filled the void in with some 6-minute epoxy.  Here's the final result before going back onto the car. Now the little plastic flange with the bolt hole will hold this piece to the frame, so it's strong enough to support the central belly shroud that screws into it.


February 2017 - glow plugs

Well, ever since I started having coolant temperature problems, the check enginen light just wouldn't go off.  I took it to the car parts store and they cleared all the codes, but very soon the light was back on.  When I thought the coolant was fixed,  the light came on for the alternator.  Now, with the alternator fixed, did I have a coolant problem again?  I took the car to the fixit store with the nagging thought that the computer printout also complained about a glow plug.  Sure enough, I was getting a code for glow plug #2 being bad.

I removed the plastic engine cover and get to the glow plugs easily.  However...   #1 and #2 were fine.  It was #3 that was reading open circuit and ..surprise.. #4 was reading way high on resistance.  I'm suspicious that the digital ODB reader counts the heads backwards because the open circuit glow plug would be #2 if you numbered the cylinders backwards.  For this narrative, I am assuming #1 on the passenger side and #4 on the driver side of the car..


all 4 plugs


two glow plugs removed


Glow plug #3 came out with an easy steady pressure using a small hand rachet and swivel connector and deep well 6-point 10mm socket.  The plugs are not square with the engine casing.  They are canted at a slight angle.  They did require a steady assertive force even after they were "broken free". 

It nearly was a big problem for me getting out #4, because it turned out fine for about a turn and the locked up tight and needed a lot of torque to get out.  Installation torque is only 11 ft lbs and I'm betting I was singificantly above double that trying to pull it out.  My hand socket was not working.  I knew something was wrong and was really hoping the plug shaft didn't snap off. That would have shut down the engine for a very expensive repair, if all all!   I grabbed a breaker bar and started going out, then in, then out, then in, then out (like cutting threads).  All the while putting on some release agent spray.  I was notably afraid the glow plug stainless steel shaft itself (only about 1/4" diameter was going to shear in two from the torque).  OUCH.  Finally it came out. 

I would not use a 12 point socket because a lot of pressure is required and if you if you wear down the hex heads, I don't think there is any way to get the glow plug out of the engine.  That would be a BIG problem. Notice on the #4 (bottom of above picture), the hex head already shows a lot of wear from me trying to get it out of the engine head.  I don't think a 12-pt socket would have worked.

Look carefully at the closeup threads below.  The #4 threads on the right are goobied up with gouged aluminum from the engine head.  The threads had all sorts of little gritty things in them, too, unlike #3 which was clean.  I think when it was installed back at the factory they messed this one up and the little grit gauled into the aluminium when I tried to remove it.  In fact, even for the threads on the right, these are really odd-ball shaped threads.  They dont look like standard v-groove threads.  I wonder if this was some cheaper way to make them.  The new glow plugs I had demonstrated more normal threads and both went back into the holes with similar torques.


threads 3   #4 threads


#3 ohms

These plugs were electrically confirmed bad in the engine block and once removed.  In the engine, the plugs were 3.5 ohm, 3.2 ohm, 600 kilo-ohm, and 100 ohm.  To check the meter leads, I also check the resistance right back to the engine block, which showed a residual resistance of 3.4 ohms.  Well.. that would mean one was negative resistance which is silly, but suffice it to say two were clearly good and two were clearly bad. In the photo you can see #3 is nearly full open circuit at 630 kilo-ohms.  Basically the filament is busted.
#4 ohms

Glow plug #4 is about 90 ohms, still WAY more than the specified single digit ohms, and I'm surprised the ODB computer didn't complain about it.  Plug #3 was doing nothing and #4 was basically a little bit warm but not much.  No wonder my engine was starting harder and harder with puffs of stuff out the tailpipe.


gp for sale 
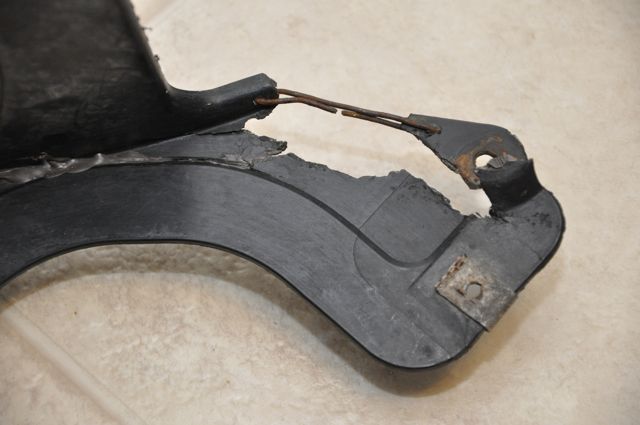
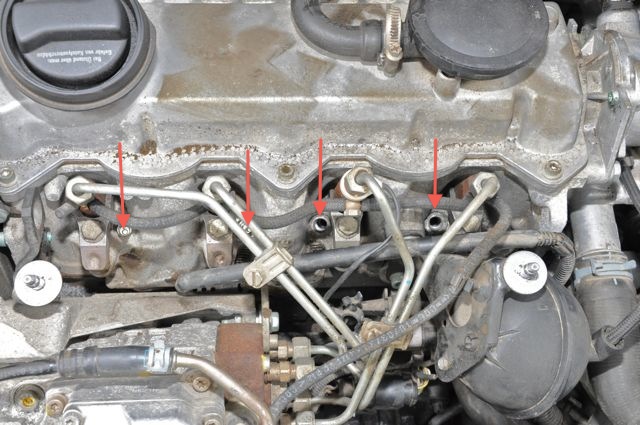
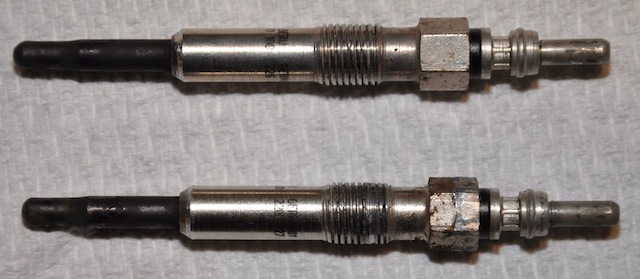
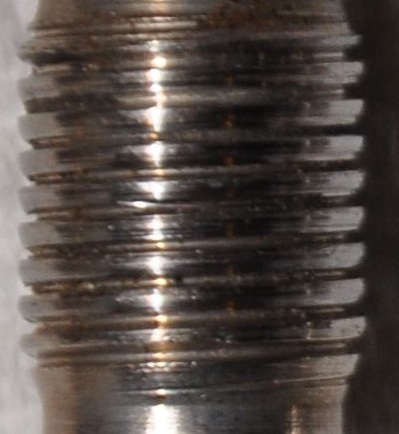
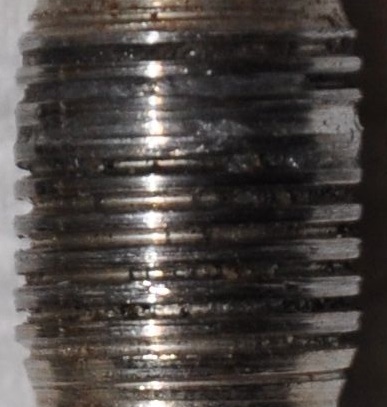
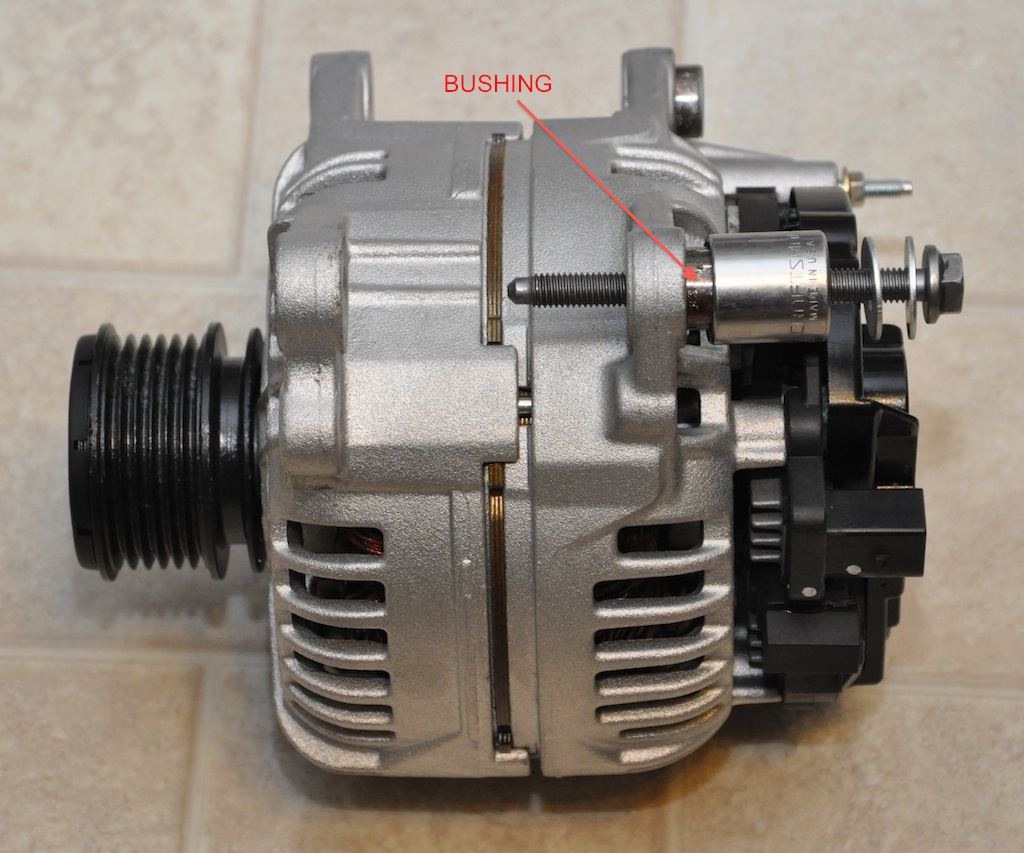
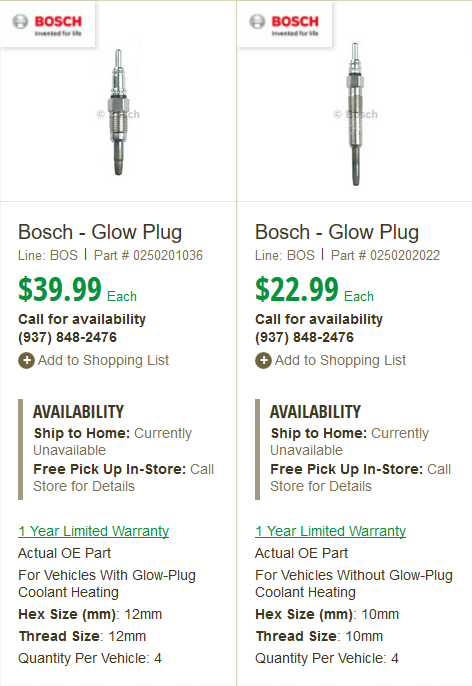
Buying new one.  The two options are 92 mm and 76 mm in length.  Read the fine print in the ads I clipped.  I DO have 3 glow plugs in my coolant line going into the engine so you'd think to buy the one on the left ("For vehicles with glow plug coolant heating").  But as you can see from the ad photos, that doesn't match and I need the ones on the right - the thinner longer 92mm version. 

I purchased two  of the Bosch 0-250-202-022.  I put on a light coating of silver high-temp brake anti-sieze onto the threads.  They dropped pretty smoothly into the glow plug holes which are canted at odd angles. I lightly rotated them counter clockwise until I could feel the threads "click" once per turn.  Then I rotated to a click, dropped the threads in place and rotated them clockwise until snug.

These do fit pretty tightly.  I was concerned about the threads on #4 being messed up, and indeed, I was not able to sense a clean "click" when rotating counter-clockwise.  But I made sure it was perfectly aligned to the hole and gently rotated it and let grab a thread when it wanted to.  In both cases, I would estimate a steady 7-8 ftlb was necessary to spin them down into the hold.  It did not feel loose like a normal bolt.  I used a small ratchet until there was resistance and then used a torque wrench set at 10 ftlb.  The wrench ended up clicking just as I bottomed out and I then
snugged each to 11 ftlbs.

All to say, be ~careful~ getting these out of the holes and going back in.  I was going to retap the holes for the threads to make sure things were clean, but I couldn't figure out how to get the metal shards back out of the engine.  Maybe they were small pieces and would have burned out the valves with no trouble, but I'm glad it didn't come to that.

I then checked resistances of all the plugs and came up with 3.7 ohm, 3.6 ohm, 3.8 ohm, and 3.8 ohm.  Again, the meter leads showed 3.4 ohms both connected to the engine block, so real resistances were in the desired range of 0.5 - 1.0 ohm, with no more than 0.2 ohms difference.  I was happy, and when I started the car, it sounded happy again, with no puff of smoke or vapor out the exhaust :-)

I still had a check engine light come on about 30 seconds after engine start, but I thought maybe the error codes just needed to be cleared out of the computer.  At the local fixit store, they again scanned the computer and it no longer showed plug #2 with a problem.  It showed plug #2 AND plug #1 with a problem.  Now  that is way too much of a coincidence that after I found the two on the driver side bad by electrical measurement, now the computer insisted the two on the passenger side were bad.  So, I still think the ODB numbers the cylinders in reverse.  Regardless of what cylinder you call them, clearly the computer was getting tricked somehow and was responding to what problems were historical, but no longer true.  I asked the technician to reset the codes, and so far the light is staying off.

Hmm...  I read an idea about how to reset the check light which I'll try next time.  Press and hold the odometer reset button, ignition key on (but not start), then hold the minute set knob CW on the instrument panel clock.  Release the knob and button at the same time.

May 2017 - glow plugs round 2

The check engine light came on.  Taking it to the fix-it store revealed that glow plug circuits 3 and 4 were giving trouble.  I had already lived through this once already and knew that the car would drive okay with the error code.  So I waited a few weeks until I had time.  

I purchased 2 more glow plugs - probably should have done this the first time around, but at $23 each I was hoping I didn't need four.  Interesting, the resistance measurements were too low this time instead of too high.   It took me only 1/2 hour to pull the engine cover, pull the two plugs and put two new ones in.  It took about 12-13 ft lbs to break them loose and they came out firmly but steadily.  Neither was very difficult like last time.

I used some high temperature thread lubricant and screwed the new ones in place and tightened them to 11 ft lbs.  The #2 plug (counting left to right as you look into the engine compartment) needed an articulated knuckle for the socket to get around the fuel injection lines.

Here's a picture of the tools I used.  Actually the entire socket set is misleading.  I used only the 10mm to take off the engine lid.  I grabbed a 10mm 6-point deep well from another kit to grab the glow plugs.  I would really recommend NOT using a 12-point socket because they are pretty tight to turn out, and there is no way to grab the sideways if you strip the flat sides.

glow plug tools

LIke last time, the two this time had carbon deposits making them look black on the end.  Here's a picture.  If you look close, you can see the threads are pretty clean on these two unlike one of the previous ones.

June 2017 - glow plugs round 3

The check engine light came on.  Taking it to the fix-it store revealed that glow plug circuits were erroring again.  This is getting old.

I pulled off the engine shroud and unclipped the glow plug hardness and tested the three new plugs.  Across the board, they were 2.2 ohms and connecting the meter lead right back to the engine block read 1.5 ohms, so that means they were each 0.7 ohms (in the target range of 0.5 - 1.5 ohms).  Measuring a resistance this low is difficult because exactly how and where you hold the test lead matters.  I used two alligator clip wires to hold everything constant and didn't record the value until it was stable for about 10 seconds.

According to Wingnut's descriptions over on the tdiclub forum, I proceeded to eliminate other reasons for the CEL. 

I disconnected the coolant temp sensor so the engine would think it was cold.  Then turning on the ignition gave a solid 12.1 volts to each of the plug connectors.  My meter lead wasn't quite long enough to get down to metal, so I used a bare copper wire piece held in the teeth of my alligator clip wires.

Also, I checked the fuse link second in from the driver side.  No problem.  Battery voltage was on all the terminals.

Looks like I might be replacing the clip-on harness. 
Again I find electrics is the Jetta's archilles heel.   TDIclub forum member tdi_allan describes how he changed the harness using the connector rather than splicing wires.   His writeup is a little cheeky with some slang that detracts from the message, but it gets you through the process.  Basically pull the battery and air filter and the square plastic wire conduit.  Swap out connectors and put everything back.

A few week later, I took the glow plug harness off and poked around into each connector shroud, using a tiny phillips screw driver with a shaft the same diameter as the glow plug tops.  I used contact cleaner and slide the screw driver around to try to dislodge any corrosion. I sprayed in some water repellant.  Coated the plug with water repelling grease used on boat motors.  Put a dab into the connector, too.  Re-installed everything. 

Check engine light stayed on for another week or two until I finally went to the store and asked to have it reset.  It's now stayed off for several weeks.  Still haven't had to buy a harness...

January 2018 - Clutch Master Cylinder

Narrative pending.  The clutch pedal kept going further to the floor before it engaged.  After a day or two, it went all the way to the floor and did nothing.  The next day, it came back a little bit and I drove the car shifting gears carefully 1-way to the repair shop - nervous the whole way to never come to a full stop because I'd never be able to shift back into gear.

Basically, pinch the hose between the master and slave and see how the pedal responds.  If it's hard, master cylinder is good.  If the pedal still goes down, the master is bad.  My pedal still went down. I didn't have time to replace it so I paid to have it commerically done. $146 labor + $191 parts (could have been a lot cheaper on my own) => $365.

[ post event observations - November 2019 - for months, everything is firm and springly on the clutch and then all of a sudden nothing - total pedal collapse to the floor.  But then pulling it back up with my hands, everything was great for another month or so.  Happened to me once on the expressway exit.  Happened to my wife about every 2nd month specifically when backing into the driveway. 
Sometimes for a few days, it would go about 1/2-way to the floor until engaging.  Then I walk back out to the car after work, and all is fine.  Finally I couldn't take it any more.  I was going to pay to have both cylinders replaced again.  But first, I decided to try $10 on brake/clutch fluid and bleed all the lines cause the brakes needed bleeding anyhow. 

I did the brakes normally (open the bleed valve while someone is pushing the brake peda).  I *had done* the clutch the same way.  This time I tried something different, realizing the slave cylinder has a volume of fluid in it that is *past* the bleed valve (downstream from the source of fluid).  This time, I had the pedal pushed all the way to the floor, and then momentarily opened the bleed valve, allowing the slave cylinder to expel the fluid.  I did this a few times and got two  bubbles of air about 3/4" long in my vinyl drain tubing.  Repated through about 3 oz of fluid until there was only very few tiny bubbles kind of like soda pop carbonation.  Clutch has been firm and fully engages now for the last 2 months. ]

November 2018 - Sunroof Drains

This is not really a problem, but rather preventative maintenance.

The sunrood drains have a propensity to get plugged up.  A tube runs down the window frame and drains out near the door hinge, but because of the "pinched end" of the tube,  dirt and silt accumulate.  When it gets very plugged, water leaks out of the tube connection at the end and dribbles down inside the car body and he passenger compartment.  I think there was a recall on this issue, but I missed the date.  Looks like I need to clean it myself.

drain in


I ran weed wacker line down the drain from the top.


drain out


At the bottom, it may come out the drain.  More likel, it will push the internal tube connection loose and you'll have to wiggle the rubber drain end piece loose from it's rubber grommet mount into the door frame.  Clean out the end piece.  The problem is then how to get it connected back to the tube inside the car frame.

By sliding the end piece up the wacker string, it will be guided back to the tube.  It actually has a tapered end to help "funnel" the tube into the connector.  Squirt a little bit WD-40 on it to make the end piece slip back to position easily.  Hold the top and bottom end of the string tight and simultaneously push the rubber grommet end piece back into position.  You should feel it "click" over the end of the internal tube.

drain tube

This picture uses a mirror on the passenger side to see the tube up in the door frame.  It is *just* out of reach and I can feel it by poking my longest finger into the door frame.  After connecting the end piece, it's even harder to slide my finger in next to it and confirm that the two pieces are connected. 

January 2019 - Tighten window clips (again 2 years later)

When I corrected the "fallen loose" window cradle/clamps back in 2017, I used 65 in lb instead of the published value I found of 88 in lb or 10 newton-meters.  I think the clamps came loose 'cause my window motor went all the way down and the window didn't.  Such is ice in the winter in the northern states.  I rolled up the window motor a couple times until the clips re-engaged with the window, and didn't use the window again until I had time to fix it.  Last time I remember getting to the window clamps was "easy", but I forgot how.  This time I took better notes. When it got warm (so plastic door parts don't crack), here are the steps:
I was able to leave connected the door latch cable and the little red LED wires by the door lock knob and set the door gingerly on the ground
Reverse for assembly.  Before clipping the door panel back in place, be sure to route the door rest electrical switch cable up and out the hole 'cause you can't fish it out of the door later!

February 2019 - Coolant sensor again 2 years later

Same as before, I started getting an intermittent check engine light.  It would come on about 30 seconds after engine start.

P0128 Coolant Thermostat (Coolant Temperature Below Thermostat Regulating Temperature)

Temperature is too low this time.  This is opposite to the "too high" error I received 2 years ago.  However, this is confusing since the engine is always too cold 30 seconds after starting in the winter! There's no way this error code should come on only 40 seconds after engine start.  No engine can be expected to warm up that fast!  If low signal = low temperature, this is probably a short to ground. 

If it comes back on and stays on, at least I know how to change the sensor.  Sensors from Advanced Auto are $24 for the 2-wire or $13 for the 4-wire (whichever your car has).

November 2019 - Alternator again (3rd and 4th time)

Driving down the highway, all the dash lights flashed and then it went black and RPM/Speedometer dropped to zero.  Five miles later, all came back to normal except the airbag light stayed on.  Drove for about 5 miles and parked it.  Engine started okay, drove 3 miles.  Engine started okay, drove about 5 miles and headlights started dimming.  When battery totally died, engine would not run (injectors quit I assume).

Insurance towed me to a repair shop.  Estimate for new battery and new alternator: $1300.00.  What?!  I retrieved the car on my flatbed trailer and started working.

Replaced alternator under warrnatee.  It did not work.  Pulled alternator and it checked bad.  Swapped for a good one.  Checked good at the store.  Re-installed again.  It did not work!  (current probe shows no current from alternator and battery voltage is not pushed up to 13.8 or 14.2 volts).  I could not keep guessing.  Maybe something deeper got fried. Towed the car to a know VW repair shop.

The experience proprietor at the single-man repair shop has been doing this for 40 years.  He said the inexpensive alternators were often weak or bad after being put on cars.  I didn't believe him, but he put on a $400 Bosch OEM alternator, and the car lit up fine and worked.  Uggh.. !   All the "lifetime warantee" alternators were NOT worth the four times I put alternator on the cars over the course of 3 years. Lesson learned.


December 2019 - Goodbye to an Old Friend

I drove the car home, and started to wonder about replacing it.  Turns out I did buy a 2-year old vehicle to replace it and put the Jetta up for sale. As I looked forward to where life was going, now was the time to reset with a newer car rather than wait five years.  Five years would have put another 60,000 miles on the car, pushing it to 243,000 miles, and that's probably a little long for me (although the Subaru I had went this far).

When I advertised it on Craigslist,  I was inundated with responses.  It appears the 2003 (last year of the ALH engine) has become somewhat of a collector's edition.  Someone drove in from out-of-state and looked it over really well.  It was in excellent condition except he said it was developing no power.  I guess I had gotten used to it like a frog in warm water eventually getting cooked. Nonetheless, he thought that would be pretty simply to currect.  He was right in both respects.

intake manifold  intake manifold EGR

The day after closing the sale, he sent some pictures of the intake manifold downstream of the EGR valve.   Ugh.. nearly totally plugged, without any DTC complaint from the computer.  The entire engine was breathing through that tiny hole!  He replaced the manifold with one he had from a project car and he said that "woke it right up!"  Lesson learned:  if you have a TDI engine and you're in that 170,000 mile range, do the preventative maintenance of cleaning out your intake manifold.  It is well worth it!

Additional Resources

© 2017 Brian Mork. Please contact me using the copyright link prior to commercial use, or reproducing for distribution in a commercial context.